SwiftUIの組み込み形状
SwiftUI’s built-in shapes

SwiftUIには、一般的に使用される5つの組み込み形状(長方形、角丸長方形、円、楕円、カプセル)が用意されています。特に最後の3つは、提供するサイズに基づいて動作が微妙に異なりますが、1つの例ですべてのオプションを示すことができます。
//-----------------------------------
struct ContentView: View {
    var body: some View {
        ZStack {
            Rectangle()
                .fill(Color.black)
                .frame(width: 200, height: 200)

            RoundedRectangle(cornerRadius: 25, style: .continuous)
            //RoundedRectangle(cornerRadius: 25, style: .circular)

                .fill(Color.red)
                .frame(width: 200, height: 200)

            Capsule()
                .fill(Color.green)
                .frame(width: 100, height: 50)

            Ellipse()
                .fill(Color.blue)
                .frame(width: 100, height: 50)

            Circle()
                .fill(Color.white)
                .frame(width: 100, height: 50)
        }
    }
}
//-----------------------------------
カスタムパスを描画する方法
How to draw a custom path
//-----------------------------------
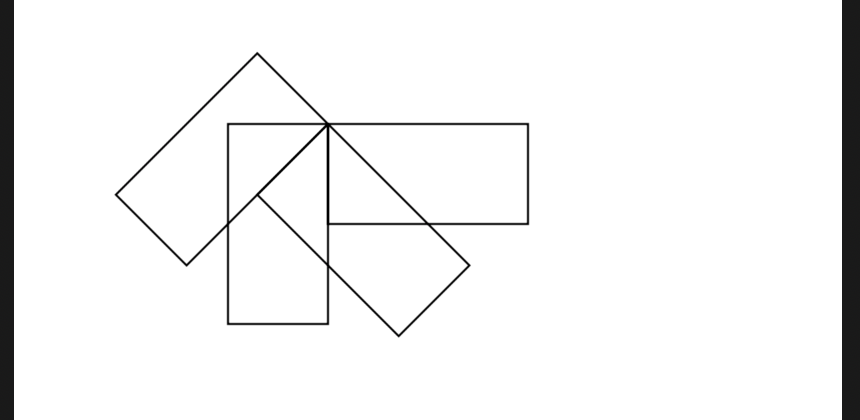
struct SpiroSquare: Shape {
func path(in rect: CGRect) -> Path {
var path = Path()
let rotations = 5
let amount = .pi / CGFloat(rotations)
let transform = CGAffineTransform(rotationAngle: amount)
for _ in 0 ..< rotations {
path = path.applying(transform)
path.addRect(CGRect(x: -rect.width / 2, y: -rect.height / 2, width: rect.width, height: rect.height))
}
return path
}
}
//-----------------------------------
//-----------------------------------
struct SpiroSquare: Shape {
    func path(in rect: CGRect) -> Path {
        var path = Path()

        let rotations = 4
        let amount = .pi / CGFloat(rotations)
        let transform = CGAffineTransform(rotationAngle: amount)

        for _ in 0 ..< rotations {
            path = path.applying(transform)

            path.addRect(CGRect(x: 0, y: 0, width: rect.width, height: rect.height))
        }

        return path
    }
}
//-----------------------------------
struct ContentView: View {
    var body: some View {
        VStack{
            SpiroSquare()
                    .stroke()
                    .frame(width: 100, height: 50)
//            SpiroSquare()
//                        .stroke()
//                        .frame(width: 50, height: 50)
        }
    }
}
//-----------------------------------
struct ContentView: View {
var body: some View {
VStack{
HStack{
Spacer()
SpiroSquare()
.stroke()
.frame(width: 200, height: 200)
}
}
}
}
//———————————–
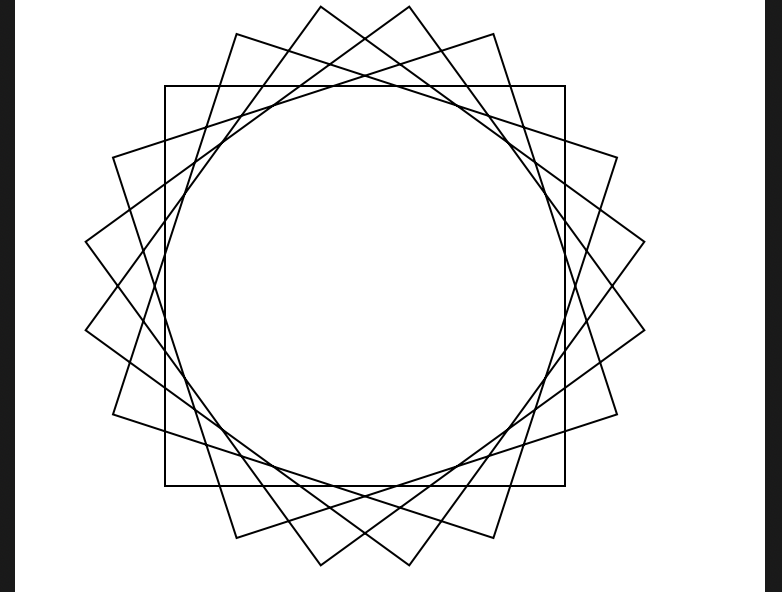
上について、パスの基準点がよく分からなかったので、以下試行。中央に描画された四角形が時計方向に回転する。
//-----------------------------------
struct SpiroSquare: Shape {
    func path(in rect: CGRect) -> Path {
        var path = Path()

        let rotations = 4
        let amount = .pi / CGFloat(rotations)
        let transform = CGAffineTransform(rotationAngle: amount)

        for _ in 0 ..< rotations {
            path = path.applying(transform)

            path.addRect(CGRect(x: 0, y: 0, width: rect.width, height: rect.height))
        }

        return path
    }
}
//-----------------------------------
struct ContentView: View {
    var body: some View {
        VStack{
            SpiroSquare()
                    .stroke()
                    .frame(width: 100, height: 50)
//            SpiroSquare()
//                        .stroke()
//                        .frame(width: 50, height: 50)
        }
    }
}
//-----------------------------------
関連リンク
SwiftUIでカスタムパスを作成する
ポリゴンと星の描き方
How to draw polygons and stars
SwiftUIの基本的なパス描画システムを理解すると、あらゆる種類の形状を簡単に追加できます。たとえばStar、ほんの少しの数学で、さまざまな星の形や他のポリゴンを表現できる形を作成できます。

//-----------------------------------
struct Star: Shape {
    // store how many corners the star has, and how smooth/pointed it is
    let corners: Int
    let smoothness: CGFloat

    func path(in rect: CGRect) -> Path {
        // ensure we have at least two corners, otherwise send back an empty path
        guard corners >= 2 else { return Path() }

        // draw from the center of our rectangle
        let center = CGPoint(x: rect.width / 2, y: rect.height / 2)

        // start from directly upwards (as opposed to down or to the right)
        var currentAngle = -CGFloat.pi / 2

        // calculate how much we need to move with each star corner
        let angleAdjustment = .pi * 2 / CGFloat(corners * 2)

        // figure out how much we need to move X/Y for the inner points of the star
        let innerX = center.x * smoothness
        let innerY = center.y * smoothness

        // we're ready to start with our path now
        var path = Path()

        // move to our initial position
        path.move(to: CGPoint(x: center.x * cos(currentAngle), y: center.y * sin(currentAngle)))

        // track the lowest point we draw to, so we can center later
        var bottomEdge: CGFloat = 0

        // loop over all our points/inner points
        for corner in 0..<corners * 2  {
            // figure out the location of this point
            let sinAngle = sin(currentAngle)
            let cosAngle = cos(currentAngle)
            let bottom: CGFloat

            // if we're a multiple of 2 we are drawing the outer edge of the star
            if corner.isMultiple(of: 2) {
                // store this Y position
                bottom = center.y * sinAngle

                // …and add a line to there
                path.addLine(to: CGPoint(x: center.x * cosAngle, y: bottom))
            } else {
                // we're not a multiple of 2, which means we're drawing an inner point

                // store this Y position
                bottom = innerY * sinAngle

                // …and add a line to there
                path.addLine(to: CGPoint(x: innerX * cosAngle, y: bottom))
            }

            // if this new bottom point is our lowest, stash it away for later
            if bottom > bottomEdge {
                bottomEdge = bottom
            }

            // move on to the next corner
            currentAngle += angleAdjustment
        }

        // figure out how much unused space we have at the bottom of our drawing rectangle
        let unusedSpace = (rect.height / 2 - bottomEdge) / 2

        // create and apply a transform that moves our path down by that amount, centering the shape vertically
        let transform = CGAffineTransform(translationX: center.x, y: center.y + unusedSpace)
        return path.applying(transform)
    }
}
//-----------------------------------
struct ContentView: View {
    var body: some View {
        Star(corners: 5, smoothness: 0.2)
            //.fill(Color.red)
            .frame(width: 400, height: 400)
            //.background(Color.green)

    }
}
//-----------------------------------
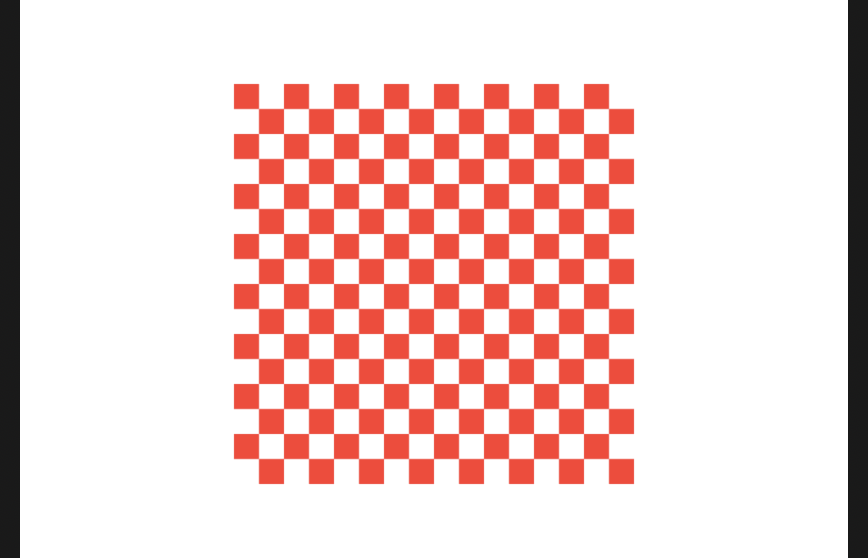
チェッカーボードの描き方
How to draw a checkerboard
SwiftUIのパスは、連続した孤立した形状である必要はなく、代わりに複数の長方形、楕円などをすべて1つにまとめることができます。
これを示す簡単な方法として、次のように、設定された数の行と列の一連の長方形を作成することにより、市松模様を作成する形状を作成できます。
//-----------------------------------
struct Checkerboard: Shape {
    let rows: Int
    let columns: Int

    func path(in rect: CGRect) -> Path {
        var path = Path()

        // figure out how big each row/column needs to be
        let rowSize = rect.height / CGFloat(rows)
        let columnSize = rect.width / CGFloat(columns)

        // loop over all rows and columns, making alternating squares colored
        for row in 0 ..< rows {
            for column in 0 ..< columns {
                //Swift5の新機能 isMultiple
                // ある数が別の数の倍数であるかどうかを確認
                if (row + column).isMultiple(of: 2) {
                    // this square should be colored; add a rectangle here
                    let startX = columnSize * CGFloat(column)
                    let startY = rowSize * CGFloat(row)

                    let rect = CGRect(x: startX, y: startY, width: columnSize, height: rowSize)
                    path.addRect(rect)
                }
            }
        }

        return path
    }
}
//-----------------------------------
struct ContentView: View {
    var body: some View {
        Checkerboard(rows: 16, columns: 16)
            .fill(Color.red)
            .frame(width: 200, height: 200)
    }
}
//-----------------------------------
SwiftUIでUIBezierPathとCGPathを使用する方法
How to use UIBezierPath and CGPath in SwiftUI

//-----------------------------------
struct ScaledBezier: Shape {
    let bezierPath: UIBezierPath

    func path(in rect: CGRect) -> Path {
        let path = Path(bezierPath.cgPath)

        // Figure out how much bigger we need to make our path in order for it to fill the available space without clipping.
        let multiplier = min(rect.width, rect.height)

        // Create an affine transform that uses the multiplier for both dimensions equally.
        let transform = CGAffineTransform(scaleX: multiplier, y: multiplier)

        // Apply that scale and send back the result.
        return path.applying(transform)
    }
}
//-----------------------------------
struct ContentView: View {

    var body: some View {
        ScaledBezier(bezierPath: .logo)
            .stroke(lineWidth: 2)
            .frame(width: 200, height: 200)
    }
}
//-----------------------------------
extension UIBezierPath {
    /// The Unwrap logo as a Bezier path.
    static var logo: UIBezierPath {
        let path = UIBezierPath()
        // 始点
        path.move(to: CGPoint(x: 0.534, y: 0.5816))
        // 次のto:が終点 + 二つのコントロールポイント
        path.addCurve(to: CGPoint(x: 0.1877, y: 0.088), controlPoint1: CGPoint(x: 0.534, y: 0.5816), controlPoint2: CGPoint(x: 0.2529, y: 0.4205))
        path.addCurve(to: CGPoint(x: 0.9728, y: 0.8259), controlPoint1: CGPoint(x: 0.4922, y: 0.4949), controlPoint2: CGPoint(x: 1.0968, y: 0.4148))
        path.addCurve(to: CGPoint(x: 0.0397, y: 0.5431), controlPoint1: CGPoint(x: 0.7118, y: 0.5248), controlPoint2: CGPoint(x: 0.3329, y: 0.7442))
        path.addCurve(to: CGPoint(x: 0.6211, y: 0.0279), controlPoint1: CGPoint(x: 0.508, y: 1.1956), controlPoint2: CGPoint(x: 1.3042, y: 0.5345))
        path.addCurve(to: CGPoint(x: 0.6904, y: 0.3615), controlPoint1: CGPoint(x: 0.7282, y: 0.2481), controlPoint2: CGPoint(x: 0.6904, y: 0.3615))
        return path
    }
}
//-----------------------------------
addCurveは、形状の右側に表示される曲線を作成するメソッドです。曲線は次のようなものです。

3つの引数が必要です。曲線の最終点(終点)と、線の曲率を実際に定義する2つの制御点です。
始点は1つ前の終点で、今回はposAが始点になります。
【Swift3】UIBezierPathで卵型を書こう【CAShapeLayer】
SwiftUIのビューサイズにあわせてPathを表示する
ベジエパスとシェイプレイヤーのビギナーズガイド